
Sunday, March 18, 2012
Woodland Park Zoo
Saturday, September 3, 2011
Lava Canyon Mt St Helens

Laurie and I finally had a chance to make it up to" Lava Canyon " on the Southwest side of Mt St Helens. Last year, road #83 was closed due to slides. I can highly recommend the Lava Canyon area near Mt St Helens if you are looking for a short interesting hike and breathtaking views of the South side of the mountain. The parking area is well kept and will accommodate approximately 25 cars. Expect this area to be crowded during periods of nice summer weather. There are toilets here that look nice, although the forest service doesn’t see the need to have them pumped regularly…yuck
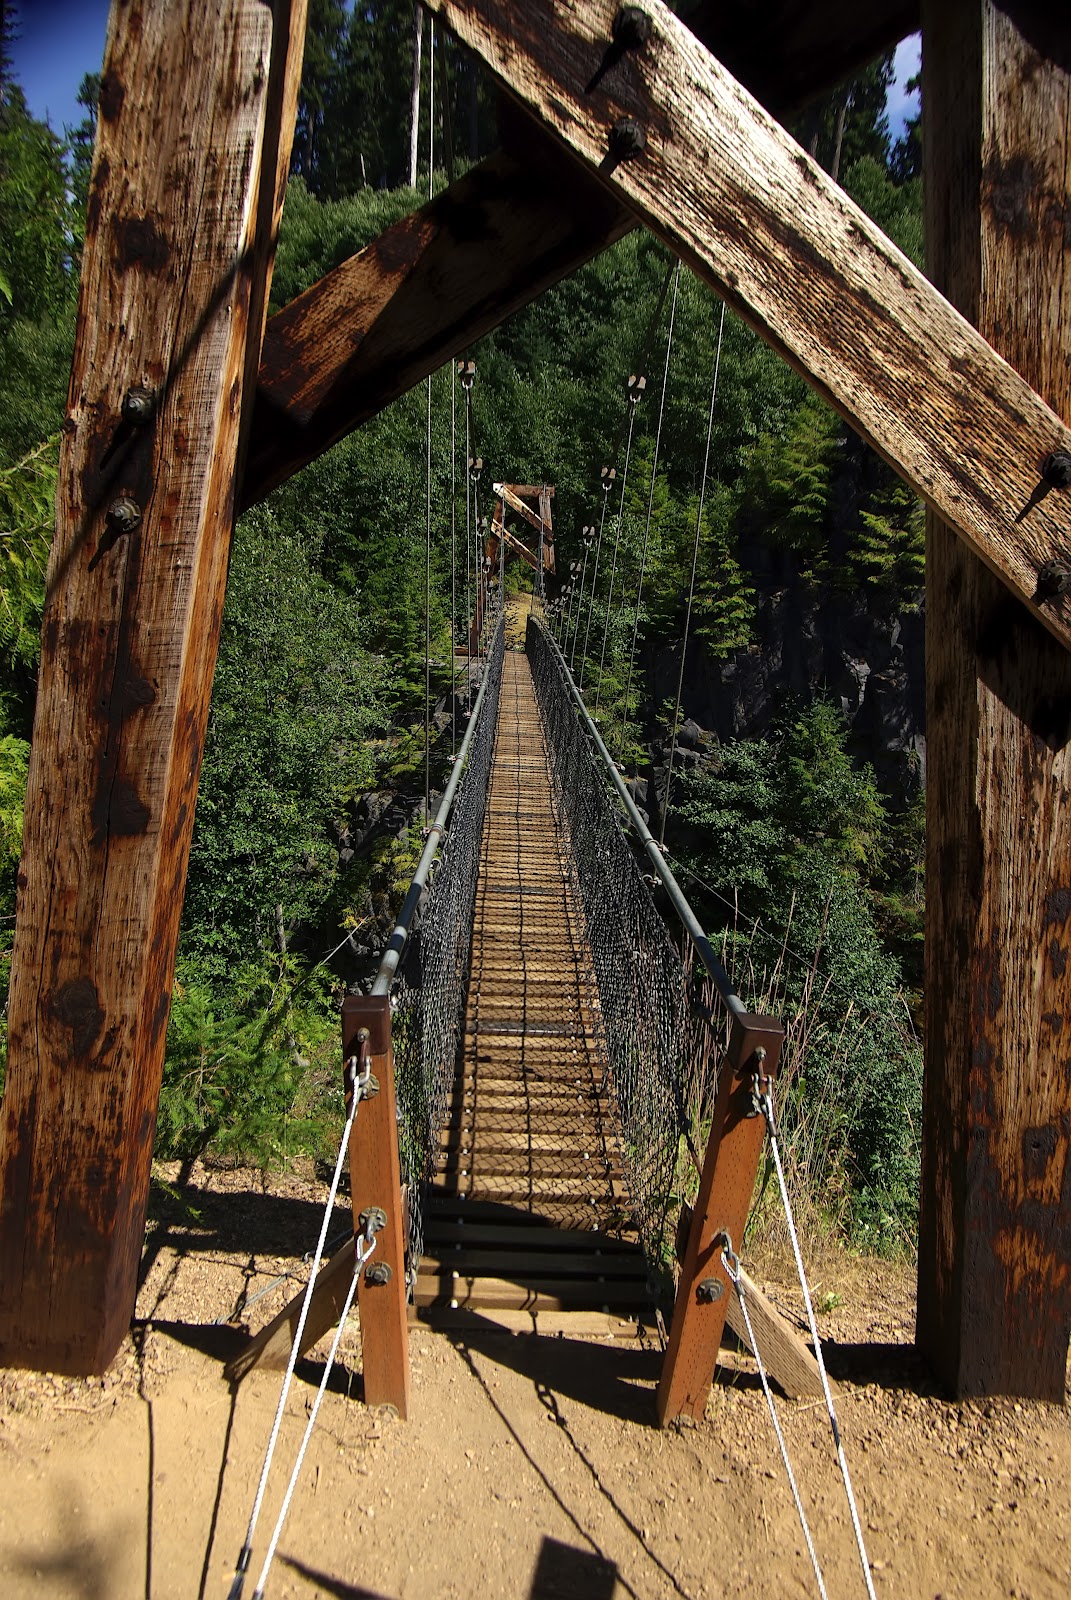 The trail starts out as an interpretive trail that is partially paved and wheelchair friendly. I wouldn’t recommend small children to this area if you plan on making the loop hike as there are many areas that have sheer drop-offs and several deaths have been reported in the area. I have pictured here a very cool well built suspension bridge that is fun to cross and affords great views of the canyon below. The " Loop Trail " is relatively short about 1 mile. There are other options that will allow a longer hike, up to 6 miles if you are looking for more exercise, just take Lave Canyon trail #184.
 If time permits after your visit you have the option to continue on 52 more miles up to Hurricane Ridge and the visitor center to take in more grand vistas of this ominous mountain..
To get to Lava Canyon- Driving Directions:
From the town of Cougar, drive east on Forest Road 90 just 1 mile beyond the Swift Dam, and turn left (north) onto FR 83. Drive 12 miles to the road end and you will see the nice paved parking area. * Note- Lava Canyon is 10 miles east of the turn-off for Ape caves..
If time permits after your visit you have the option to continue on 52 more miles up to Hurricane Ridge and the visitor center to take in more grand vistas of this ominous mountain..
To get to Lava Canyon- Driving Directions:
From the town of Cougar, drive east on Forest Road 90 just 1 mile beyond the Swift Dam, and turn left (north) onto FR 83. Drive 12 miles to the road end and you will see the nice paved parking area. * Note- Lava Canyon is 10 miles east of the turn-off for Ape caves..
Saturday, March 12, 2011
The Alvord Desert Road Trip


When photographing the Playa (dry lakebed) it is preferable to go during dryer months so that the cracks that develop will be the most spectacular, and that driving out and even camping on the Playa will be possible. Well I can report that none of the above happened for me. The forecast was calling for 20% chance of snow and low temps around 27 degrees- Yaaah…Wikipedia says that this region only gets 7 inches of annual rainfall, I think 1/3 of that fell while I was there.
As you can see from the photos I got what I was after, and a whole lot more. The view from above looking down on the Playa was spectacular; the wind, not so much. I also noticed that I had a flat tire on my brand new Les Schwabbies presumably from one of the sharp rocks, it slit the rubber between the treads. During my research of the area I had read accounts of the people getting numerous flats out here and sure enough I was also a victim. Now I know why people buy off-road jacks, they are much easier to use than crawling under a vehicle to prop up a 11/2 ton hydraulic car jack that only raise the tire about 5 inches. It took about one hour for me to change that tire and boy was I glad I brought a shovel. I just could not get that spare on without some excavation work.

I was determined to set foot on the Playa and try some photography after driving all that way, Scout and I headed down a very steep hillside that would allow some access to what looked like a dry section of the lakebed. Distances are very tricky out there with no discernable landmarks. It took twice as long as I would have thought to reach the playa. The photography gods smiled on us for a brief time allowing for a little photography that you can see here. I was also pretty impressed with the cracks, if only I could keep scout from running in circles in front of my comps with his muddy paws and ruining my shots.

After returning up the hill and to the car it was nearly 4:30pm and I decided to wait and see what kind of sunset might transpire in terms of a lightshow or lack thereof. I waited patiently and watched the storms continue to come, finally the weather broke and I was able to set up the tripod and make an attempt at an image. Cloud cover mostly obscured the sun and the sunset was, for the most part a bust as you can see in this photo.
Camping in this area was totally out of the question the wind and rain was so intense it ripped the shovel off of my luggage rack that I had attached with bungees. I knew I wanted to go home via an alternate route that would take me into Nevada and then onto Lakeview Oregon via Hwy 140, then through K-falls and Medford and up I-5 to home. I got gas at a place called Denio Station for about $5.00/ gallon I'm not really sure what I paid I just know I told the guy $40.00/worth. At this point in the evening it was clear and cold, I was exhausted and needed to find an area to camp for the night. I drove about twenty more miles and found a very small rest area where I promptly pulled over. I ripped every thing out of the vehicle so I could make the sleeping configurations with the seats, then blew up the therma-rest and pulled out the 0-dgree bag. We spent 11 hours in the car getting up several times two warm up the car. It got very cold that night and it snowed on us as well. The photo you see below is Hwy 140 after the snowstorm. Needless to say that the 100 miles to Lakeview were a little hairy.

It took about five hours to reach Medford from the Alvord Desert. All in all I drove 1100 miles in about 38 hours. If I ever decided to come back to this area again I would prefer to go in the late summer, maybe September. I will also bring two spares, it is unnerving to have already used your spare and not have a backup in such a remote area.
Note* For higher quality images of this area go here.
Thursday, February 10, 2011
Landscape Photography FAQ
How important is camera choice in my landscape photography?
Whether you decide on shooting film or digital media, camera choice has very little to do with your ability to convey a well composed dramatic image. Some of the finest photographs hanging in museums around the globe were shot using the most primitive of cameras. The only thing to consider is budget constraints vs. the medium you will choose to display. For Web based applications any thing above 6mp will serve you well. If you plan on displaying in a Brick and mortar gallery I would recommend 10mp and above or shoot medium format film.
How do I select my composition and subject matter?
Landscape Photography is very subjective however there are things you can do to improve the appeal of your photos. Is the subject matter interesting? Do people care? What do you want to communicate to the viewer? Sometimes it’s a good idea to compress a landscape with a Telephoto Lens in order to isolate the important elements. It is often a good idea to follow the rule of thirds so that your images are more aesthetically pleasing. Make sure you exclude the elements that are distracting. Choose a pleasing foreground if possible.
How do I handle harsh or extreme lighting situations?
Lighting will always make or break a photograph, try to avoid shooting in the harsh light of midday and concentrate on early morning pre-dawn and sunrise as well as late evening twilight and sunsets. The greatest and most dramatic light will occur during these times. The use of polarizers and neutral gradient filters is imperative for Landscape Photographers to overcome the deficiencies between extremely bright sky’s and dark foregrounds. Always expose for the highlights, as they cannot be brought back in post-processing. Another technique for handling harsh light is to shoot two photos exposing for the shadows and then another shot exposing for the highlights, merge the images later with your favorite processing software.
How do I keep challenging myself photographically?
Always seek out knowledge by reading everything photographic from: Photography Blogs, E-zine articles, magazines,photography forums, ect. By learning from others and utilizing new techniques in the field you will be able to improve your skills with every outing. Try different locals that provide atypical images. In the harsh winter months when you may be homebound or subject matter may be limited go to your digital darkroom and rework older photographs from earlier in the year. Shoot mushrooms in the fall or maybe put your fast telephoto lens on and shoot some extreme sports or a local event like a marathon run.
How do I carry all my photographic gear?
Very rarely do I see the need to carry your full arsenal of gear to any one shoot. I select the photography gear the shoot will warrant. For backpacking I usually pack my wide-angle lens and a lightweight slow mid range telephoto lens as well as my smaller Manfrotto tripod. I strip down the camera removing straps and battery grips and place in bubble wrap in the top portion of my Gregory Pack. For day trips when I will carry more gear I love my Tamrac 5275 Expedition 5 Photo Backpack (Black)
What tripod should I buy?
There really isn’t one answer here when choosing a tripod as this depends on so may factors including personal shooting preferences. The prevailing wisdom suggests buying the heaviest tripod you are willing to pack around. Carbon Fiber Tripods are extremely popular for the strength and load bearing capabilities vs. weight but tend to be fairly pricey. I personally use the Induro Carbonflex 8x Tripod CX-214
as my workhorse. Considerably less money than the venerable Gitzo brand. I also own a Manfrotto 785 Modo Maxi Photo Video Grip Head Tripod
for small cameras and when on long hikes or backpacking. I really like the clip style leg extensions that all Manfrotto Tripods incorporate.
What about a tripod head?
Most Landscape Photographers I am aware of predominately choose a ball style tripod head for reasons such as fluid movement and little maintenance. I chose the the Giottos Pro Calibrated Ball Head w/Quick Release 1/4IN. Thread MH647; Tension Control; Load 25 Lbs. - Giottos MH1300-657
and have been very happy with it.
What filter system do you recommend ?
As I have stated before the use of graduated neutral density filters is a must for Landscape Photographers but the question is, what system will hold those filters in front of you’re lens in a secure manner. I use threaded screw on style circular polarizers along with neutral (no effect on color) density filters. When it comes to graduated filters I like the Cokin Filter Holder for Z Series Filters
. Cokin makes several systems but it’s important to remember that when using wide-angle lenses that vignetting can be a real problem. The Z pro or the X pro are designed for such wide angle applications. I have heard great thing about the Lee Foundation Filter holder as well.
Which are better filter materials glass or resin ?
Cokin uses an organic glass called CR39 however this material will scratch if care is not taken. Other filter manufactures like Lee make a glass filter LEE Filters .9 ND - Filter - graduated neutral density soft
that will also fit in your Cokin holder and as an added benefit they are 100mm long and easier to place or even hand hold and will never scratch.
Saturday, February 5, 2011
Replacing A Sky, The Controversy
For many Landscape Photographers the idea of replacing a sky in Photoshop is considered taboo. For the most part I completely agree that we Landscape Photographers should try to replicate a scene as closely as possible to what the conditions were at the time we snapped the shutter. We also know that Mother Nature often will not cooperate with us on our photography outings. On many occasions it simply isn’t possible to return to an area over many times to re-shoot the same scene in hope of getting that beautiful sky we all hope for. We photographers end up with a dull gray bland sky that simply ruins the feeling we are trying to communicate.
 I find it permissible for the purposes of Web display to show photos that have been altered especially when posting a Blog image. I would not advocate selling a gallery wrap or framed print that had an altered sky. The techniques for changing or replacing a dull sky are many and varied. It can be fun and challenging as well to practice different methods. Some of the easiest images to alter a sky are ones that have a very simple transition line between the foreground elements and the sky, void of trees and or other distracting elements.
 If you search sky replacement techniques on You-Tube many results will come up, with great tutorials. One of the simplest methods is to make a selection of the sky you want to discard then grab the selection of the new sky from another image and paste into selection of the first image. Another simple method is to simply drag the photo of the undesirable sky over the preferred sky image and using the eraser tool carefully erase away the sky portion of the image until the new sky has emerged. You can also do the same thing with a mask being very careful when erasing around the transition points. Depending on the image one of the hardest thing for me is making the initial selection, in some cases I just won’t attempt replacing a sky as it is just to obvious.
Here are two shots I took at lake Billy Chinook near Madras Oregon on a very dull day. These two images have had skies added to them. If you look at the Billy Chinook Falls image at full resolution you will see an example of the very poor transition line and the terrible selection job I did resulting in an unfavorable image. The other image of Lake Billy Chinook had a much smoother transition line and although not a great job it looks a little more natural than the first image.
Wednesday, January 26, 2011
SIGMA 70-200mm F2.8 II APO EX DG MACRO
A Personal Review

I am giving a Sigma Lens review for my Sigma 70-200 mm F2.8 II APO DG Macro Lens with a Pentax “ K“ Mount that I purchased about one year ago. If you are looking for a more detailed tech heavy Sigma Lens review then I will steer you to a better sight for that later. I am not trying to re-hash facts that are already on the web but rather give my personal experience with this Sigma Lens.
I love Sigma Lenses for the following reasons:
I initially bought this Sigma Lens for the sole purpose of photographing my daughter’s high school dance competitions. I really needed the F2.8 aperture for the poor lighting that is in most gymnasiums. The Sigma Lens worked very well for this intended purpose; although I still had to crank up the ISO to 1600, which enabled me to stop the action I needed. Here is an image from one of the competitions.
- Great packaging
- Well built and sturdy
- Economical in comparison to Canon and Nikon
- Shipped with a great case with strap
- Responsive auto focus and tracking
- Large smooth focus and aperture rings
- Lightweight
- Manual/ Auto focus button on lens
- Alternative focal lengths from Pentax
- Tripod mounting collar
I initially bought this Sigma Lens for the sole purpose of photographing my daughter’s high school dance competitions. I really needed the F2.8 aperture for the poor lighting that is in most gymnasiums. The Sigma Lens worked very well for this intended purpose; although I still had to crank up the ISO to 1600, which enabled me to stop the action I needed. Here is an image from one of the competitions.
As I continued to use my Sigma Lens I grew to love it more and more. I have used this lens to photograph The Upper Clackamas River Whitewater Festival with great success. Here are some shots from that event. Another great uses I found for my Sigma 70-200 mm Lens is photographing the Portland Zoo. This Sigma Lens aloud me to isolate zoo animals and block out distracting man made objects giving a much nicer natural look at these animals. Take a look at this small gallery I took at the Portland Zoo.
I have used this lens for Macro Photography as well. With a minimum focusing distance of 100cm I was able to get some very nice shots of mushrooms at Silver Falls State Park. This Lens is also great for floral or insect Macro work, as this focal range will give you more working distance from your subject.
This Sigma lens is priced at around $800.00 US; compare that to a Canon 70-200 that sells for around $2,200.00. I will say that this Sigma Lens is not as sharp as the Canon or Nikon lenses in this category it is a great alternative for the budget minded hobbyist or budding pro. Get your Sigma Lens here.*NOTE* For a detailed review of this lens heavy with all technical data go here.
Saturday, January 1, 2011
Pentax K5
Thinking about a new camera for the new year ? I certainly am considering a new purchase this year. I currently shoot with a Pentax K10d and while it does a fine job it has become quite dated now and I really would like some added features like: 16.3 mp, improved metering,refined LCD screen, live view, faster burst rates and improved ISO performance. Although I certainly cannot afford to get every new model that comes out I think Pentax has finally enticed me with there latest offering the Pentax K-5 16.3 MP Digital SLR with 3-Inch LCD (Black Body Only)
If you consider yourself a proud Pentaxian or maybe just want to step up to an advanced mid-level DSLR then I would urge you to take a look at what the K5 has to offer. Certainly a well built and completely weather sealed chassis, this camera is built to last and take on the elements. For an in depth review I recommend DP Review the go to resource for all things photographic.
If you consider yourself a proud Pentaxian or maybe just want to step up to an advanced mid-level DSLR then I would urge you to take a look at what the K5 has to offer. Certainly a well built and completely weather sealed chassis, this camera is built to last and take on the elements. For an in depth review I recommend DP Review the go to resource for all things photographic.
Thursday, November 25, 2010
California Redwoods Photography
Whenever I have an opportunity to visit the California Redwoods I do; and this trip to San Francisco was no exception. Ideally the optimum time to visit these parks would be in late may an early June. The classic shot that includes rhododendrons still eludes me to this point. I prefer the Northern Redwood forests especially the Lady Bird Johnson Grove near Crescent City as pictured here on a Colorless November day.

On our return drive home from San Francisco we visited Muir Woods National Monument, named after famed conservationist John Muir. I was somewhat disappointed to the extent that there was so much under growth and that it is very confining to stay on the trails; some of the trails are actually wood planks. There is a $5.00 entrance fee and parking can be a real issue here as well.
California Redwoods are some of the tallest living things on our planet. I was interested to learn that they can achieve heights of nearly 400 feet whereas the giant sequoias of Yellowstone won’t achieve quite that stature, topping out at around 310 feet. Giant Sequoias are however in terms of total volume the largest living plant on earth.
Many people including myself wonder about the lack of red color that traditionally has been associated with this species. Most images I have seen of these giants lack considerable color. The moisture content of the bark is really the key ingredient in bringing out the reddish tones. The longer it has been raining the more color will be seen.
Photographing the redwoods is challenging and humbling, as settling on a good composition is tough. I try and look for an open area clear of undergrowth with several large trees. Also trying to give a sense of scale is hard as well. One of the finest images I’ve seen was from Landscape Photographer Floris Van Breugel titled
“ Life Among Giants “ not only is this image aesthetically pleasing and beautiful with Dogwoods in the foreground, a pair of deer in the lower left hand area give this photograph scale. My next trip down to this area I hope to visit Humboldt Redwoods State Park, which contains some of the tallest specimens around.
“ Life Among Giants “ not only is this image aesthetically pleasing and beautiful with Dogwoods in the foreground, a pair of deer in the lower left hand area give this photograph scale. My next trip down to this area I hope to visit Humboldt Redwoods State Park, which contains some of the tallest specimens around.
Sunday, November 21, 2010
Shore Acres - Angry Ocean
There is an area on the Oregon coast where the oceans fury can really show her stuff, especially in the winter stormy months. Shore Acres State Park is just such an area. There is an iconic shot that I am after that has eluded me on previous trips to this area. Shore Acres can be accessed from the Coos Bay, North Bend Area Via the Cape Arago Hwy. As you travel west you will pass through the town of Charleston then You will have the opportunity to visit three state parks in succession; Sunset Bay State Park, Shore Acres, and finally Cape Arago State Park.

I was mainly concerned with visiting Shore Acres because I knew what I was after. There is a $5.00 parking fee here, but well worth it in my opinion. You get an added bonus at this park; the Botanical Gardens are truly beautiful during the spring and summer months. In the winter months the gardens are transformed into a holiday light spectacular; a tradition started by the Friends Of Shore Acres in 1987. Here is a link for detailed info on this event.
Now back to the photography. The seas were moderately angry and I did see potential for some good wave action. I proceeded to mount my Sigma 70-200 2.8 lens and secure it to the tripod before leaving the parking area. The skies were unstable and squalls were threatening to roll in overhead. The park has constructed a nice viewing structure when conditions get to stormy to stay outside, I did use it to dry off myself and equipment a couple of times. As I shot I knew I needed to stop the wave action with a fast shutter speed so I left off the polarizer and set my camera to fire in burst mode. I spent the next 45min shooting three shot bursts and waiting for the sun to show. Out of the 100 frames I took this is really the only shot I was marginally happy with, the waves can get twice as high under the right conditions. Another point I will make is lens selection. The 70-200 was the wrong lens for this shoot and my 16-20 would be to wide. Ideally a 24-70 would be perfect in my opinion. I will definitely shoot this area again. It is exhilarating watching the waves and trying to capture that perfect shot.
Bandon Oregon A Photographers Dream
 I’ve seen such beautiful photography come out of the Bandon, Oregon area; yet I’ve never accessed the beach the several times through the area until recently. Bandon is a very small community with only one public beach access sign from Hwy #101. What make Bandon’s beaches so photogenic are the numerous sea stacks that are tightly bunched in this one stretch of beach. As I approached the beach from Hwy #101 the first area I came to was called Oregon Islands; an area I had never heard of before. I didn’t recognize this area from photos I’ve seen during my research for this trip.
 It was getting late in the day and the wind was blowing hard at 50mph gusts. I scouted the area for a short while and then we called it a day and proceeded north to Coos Bay to stay the night. That next morning Laurie and I drove back to Bandon on a much calmer day, also there were patches of blue sky with fluffy clouds. I was getting somewhat hopeful for a good shoot. As we arrived at Oregon Islands once again we simply drove south on Beach Loop Dr. for ¼ mile and arrived at Face Rock State Park. I immediately recognized this area by the many sea stacks as the area I had seen, and wanted to shoot. I donned my extreme weather coveralls, rubber boots and wool hat; grabbed my tripod and camera bag and set off for some fun. There are so many compositions to be had here I could spend several days at sunrise and sunset staying very busy enjoying this area in the future. I noticed some very nice rental homes overlooking the area and thought of a future 3-day weekend here would be great.
Subscribe to:
Posts (Atom)
