Thursday, December 10, 2009

HDR Software Reviews

F-14 Tomcat HDR

Are you ready to try something a little different this winter? Does the weather have you home bound or just uninspired photographically. This time of year is when most landscape enthusiasts are able to spend more time on the computer finishing the backlog of shots that were taken in the preceding months.

I currently use HDR(High Dynamic Range) software for finishing landscape images where my cameras sensor can’t pick up the many stops of light in a dynamic scene. Recently however I've begun using HDR simply as a tool to render surreal and sometimes otherworldly images as strictly an independent art form…..Bye the way, it’s also quite fun.

I will introduce you to a few programs out there including freeware, shareware and trial software that you will pay for later. Each program has it’s pro’s and cons and little quirks as well. The program that is the most recognized starts out our review at no (1) Photomatix Pro is a plug-in extension for Adobe products such as Adobe Photoshop Lightroom 2 , Apple Aperture 2.1.1 and Adobe Photoshop CS4. The Pro version can be purchased as a stand-alone program for those using other imaging software. Version 3 is currently out and can be purchased for $99.00 from Amazon.com. I recommend getting the free trial version before laying out the cash.

At no. (2) on our list is called Easy HDR written by Bartłomiej Okonek or (Bartek). I personally purchased this software and use it primarily for my landscapes. You can check out the flickr pool of shots here. Easy HDR by its namesake is very simple to use and provides great online tutorials.
Currently I use a free program called Qtpfsgui it also makes no. (3) on our list. A great program for deep manipulation as seen above with the F-14 Tomcat image.

Here is a great site to see a list of free HDR software
I can highly recommend the following two HDR books...

Sunday, October 25, 2009

Little Zigzag Falls Directions

Little ZigZag Falls

Here’s my take on this little charmer, one of only a few waterfalls on Mt Hood, the little Zigzag Falls are not a disappointment. The very short hike will reward you with the 75-foot drop high volume falls. The Little Zigzag Falls on the West side of Mt. Hood has very easy access.

Getting There: Head East on Hwy #26 after passing the towns of Rhododendron and Zigzag on you’re way towards Govt. Camp and as the road starts a continuous uphill grade start looking at road markers on the left. Approximately 4 miles East of Rhododendron you will turn left on Road #39; a large sign that directs you to the Mt Hood Kiwanis Camp also denotes this road. After turning onto Road #39 drive until the road ends ½ mile past the Kiwanis camp. There is a large turnout and a clear marked trailhead. The falls are a mere 1/3 of a mile upstream.

Other falls to consider while up on the mountain are: Tamanawas Falls located just past Sherwood Campground on Hwy #35 also you may enjoy Sahale Falls accessed just past the Mt Hood Meadows ski area off of Hwy #35.

Saturday, October 3, 2009

Custom White Balance Suggestions


As a landscape photographer you may never have thought about introducing a custom white balance to you’re workflow in the field, but you may wish to try this option after reading further. I’ve always known about the option of custom white balance in my cameras menu, however never gave it much thought. A fellow photographer who shoots primarily outdoor portraits opened my eyes to this option and made me take a second look at the technique.
Most photographers agree that white balance issues are quite correctable in post processing whether shooting RAW or JPEG. Correcting an entire photo is one thing but nailing the white balance in a specific area is quite another. For instance you may wish to have perfect white balance on foreground elements and let the rest of the photo take on characteristics from an unusual colorcast on water elements that add to the visual impact of the scene.
There are several tools that allow one to achieve perfect white balance read from surrounding light specific to a scene. From a simple Grey Card to a fitted white lens cover; one company makes a lens cap that will replace the factory cap and will provide perfect white balance. In my estimation the best tool on the market and not surprisingly the most expensive tool is the ExpoDisc made by Expo Imaging. It is the painstaking way that the ExpoDisc is constructed of high optical grade plastics that provide perfect neutrality and diffuse the light before it hits the image sensor. The results are stark and for me a game changer.

Using the ExpoDisc is quick and simple. Go into the custom menu of you’re DSLR and then into the custom white balance turn it on place the ExpoDisc on the front of you’re lens and depress the shutter release to set the white balance for that scene.

Other tools with great fanfare are the Lastolite Ezybalance collapsible grey and white panels. They are washable and stow easily and will double as a reflector or hood shade.
Also the “ Digital Calibration Targets “ From Photovision Products can be used on the back end providing a perfect white section, 18 % grey in the center for nailing exposure. A black section is also included on the same panel for you’re eyedropper tool in P/S to dial in a true black that may be lacking in you’re composition.

Just because you may not be a portrait photographer don’t be shy about using custom white balance tools for landscape and Macro work. Happy shooting Shawn…

Note: Photo provided by expoimaging.net

Sunday, September 27, 2009

Elowah Falls Info And Directions

Elowah Falls


Took another trip to Elowah Falls Today …trying to capture a full-length shot of the drop. I took “Scout “ our new boxer puppy that is about three months old now and seems to love the trail. Anyway the crowds were low at least in this area, and so by the way was the water level. The low flow of the falls allowed me to climb up the right flank that would otherwise be a misty soggy treacherous and somewhat dangerous climb. As you can see I achieved my goal of photographing the entire falls although I’m not thoroughly happy with the composition. I tried a couple of comps from stream level but nothing really inspired me.

For some reason these falls give me some trouble and present challenges that other falls don’t. At any rate you can expect a different look from these falls every visit and it's such a short hike 1.4 mile R/T from the parking area that many visits may be warranted.

Getting There: Heading I-84 Eastbound take the Ainsworth park exit the proceed further East on Frontage Road approximately 1 ½ miles to the John B. Yeon State park turnout. There’s room for about 15 cars and there are no facilities." Note " You can also access McCord Creek Falls from this parking area.

Saturday, September 12, 2009

Eastern Oregon,Hells Canyon and the Painted Hills


Laurie and I just got back from an Eastern Oregon road trip that encompassed the entire northeast region of the state. It’s hard to believe we traveled over 900 miles and never crossed state lines and really only scratched the surface in terms of exploring Oregon in it’s entirety.
The Painted Hills

The trips conception was certainly based on photographic pursuits as well as seeing areas of Oregon that were new to us. On the short list were of course the Painted hills, Hells Canyon, and the Wallawa Mountains to include Wallawa Lake.


We traveled over Mt Hood through Maupin down into Shaniko, Fossil and finally reached the town of Clarno. The first of three visitor areas that make up the John Day Fossil beds National Monument start in Clarno. There is little to see here except for some ancient rock formations that were formed 55 million years ago
. Just three miles east of Mitchell Oregon we found the Painted Hills Unit. These are spectacular and quite stunning to see first hand. A photographer’s paradises indeed as you catch the first glimpse of color in the hills. However it’s not just the color that makes this place so special; but also the perceived texture of the formations that give it that otherworldly feel. The formations look like velvet but are actually made up of hard clay, Siltstone and Shale.
Painted Patterns

Approximately 1-hour east near John day are the Sheep Rock Unit and more fossil beds. This area was a bit of a disappointment. We were to late to enter the Thomas Condon Paleontology Center, which houses all of the regions Fossil collections. Also the formations were jagged and a bluish green in color. If we had more time I would have liked to take in a couple of the nearby hiking options to explore further.


We spent the first night at the Best Western in John Day knowing full well we had a huge day ahead of us in the morning. After several hours of wandering through vast uninhabited regions of the northeast we stopped in Baker City to refuel ourselves as well as the car. The next objective was to head into the Hells Canyon region of Oregon to catch a glimpse of the Mighty Snake River. It turns out that the wild Snake River is considerably north and down stream of the Hells Canyon Dam. We never did see any beautiful scenery of the Snake River and decided to cut our losses and take the only road over towards Joseph and Wallowa Lake. Yes it is a 64-mile wild ride of twists and turns that takes you past the Hells Canyon Overlook. It is quite a vista and deep gorge and yet the Snake remains elusive even here.

Painted Detail
Hells Canyon Overlook
When we finally reached Joseph we were somewhat weary travelers at this point and decided to book a room only minutes from the lake. Stayed in a old but quaint motel called the Indian Lodge Motel. New mattresses and fire hydrant like water pressure in the showers were a couple of nice attributes. The town of Joseph is very nice and is bolstered by a huge art community that has donated many works to the city, which are displayed along the streets. Apparently there are three bronze foundries in town as well. The town takes on a wonderful vacation feel in the evening hours as many of the business are creatively lit which ads to the warmth of the town. We took an evening stroll after enjoying a fireside outdoor meal at the Embers Brewhouse.
Wallowa Lake At Dawn

I awoke early, pre dawn in fact to photograph Wallowa Lake; however that magic moment never materialized and I was disappointed with all of the images. The sweet light doesn’t always happen especially on a cloudless Eastern Oregon morning.

Anthony Lakes

The next day took us through Tollgate Oregon and up and over the Blue Mountains where we visited the Anthony Lakes area.
We then came through Pendleton and linked up with I-84. It's a 200-mile trip through the Gorge to home so we stopped off in the Dalles for a Mexican dinner at El Mirador.
Great trip as always and I thank Laurie for all the safe driving and companionship.

Sunday, August 2, 2009

Oneonta Gorge Adventure Awaits You !!


Oneonta Gorge


Have you wanted to go on a really cool little adventure? Well I have the answer and it may come as a surprise how relatively easy it is and within such a close proximity to the Portland area. I'm talking about Oneonta Gorge located just east of Multnomah Falls on the Historic Columbia River Highway.

The adventure part comes in when you're hiking trail is a stream and you must negotiate a huge log jam; other than that it's a piece of cake in terms of outdoor photography outings. You see over the course of a couple of extreme winters and subsequent flooding huge amount of deadfall and lumber have piled up in the mouth of Oneonta Gorge. Once the logs have been crossed it's an extremely easy stroll through the creek less than ½ mile to the Lower Oneonta Gorge waterfall.
Oneonta's Narrow Gorge

The water this time of year was extremely comfortable and the deepest pool went up to my waist. I'm 6' 3" and so I may not recommend this hike for smaller children. I chose to wear my Hodgman Wading boots with the felt sole, worked like a charm. Get there early to avoid crowds if you can. I arrived at 8 am and had the Gorge to myself, any earlier and lack of light would be an issue. You also may be wondering if there are dry spots to set you're gear down and set up shot and yes there are plenty of dry areas that are exposed this time of year.
Oneonta Falls

Getting There: Coming from Portland take the Bridal Veil Exit off of I-84 then proceed East passing Multonmah falls by approximately 1 mile. The parking area is well marked on the right side of the road and is denoted by a large sign reading Oneonta Gorge as well as a large wood pedestrian tunnel.

Happy adventures, Shawn…

Sunday, July 26, 2009

Heceta Head Lighthouse And The Legend Of The Lady In Grey


Most of the Family and I just got back from a mini trip to the central Oregon Coast. Florence to be exact where we rode Quads at
Winchester Bay in the heart of dune country just south of Reedsport Oregon. I highly recommend this activity. If you are a first timer and want to get an idea of the sport there are many rental options in the area. I recommend Dune Country ATV rentals.

One of the main attractions of the trips for me was to visit and photograph the nearby lighthouses. The Umpqua lighthouse is located virtually next door to the previously mentioned Dune Country and in the heart of Discovery Bay. The Lighthouse itself sits amongst the Coastguard barracks and housing making photography very uninspiring. The lighthouse is well kept and has been freshly painted. The only good vantage point for photography is from out in the dunes area looking back at the lighthouse. You may be able to eliminate most of the distracting elements from this vantage point.
Heceta Head Lighthouse

Next we set off approximately 1-hour north on the #101 to visit the Heceta Head Lighthouse. Just prior to reaching the parking area you will be rewarded with a spectacular view of the lighthouse from a roadside viewpoint. Once inside the parking area there is a self-pay area that you will need to purchase a $3.00 parking permit from. There are nice well maintained trails that take you right up to the lighthouse where guided tours are available for those that are inclined to walk inside and hear a little history about the area and the adjacent
haunted lightkeepers house. The legend of the Gray Lady.
As far as photography goes, there are many compositions to choose from and as a matter of fact a trail will lead you directly behind the lighthouse so you may get this vantage point.

Ideally the best scenario is to sit patiently behind the lighthouse looking west and wait for that incredible sunset and capturing the glow of the Fresnel lens as it makes it’s revolutions. This would require some planning and walking out in the dark of night.

I wish to make a trip back to do just that and in addition would spend several hours at the
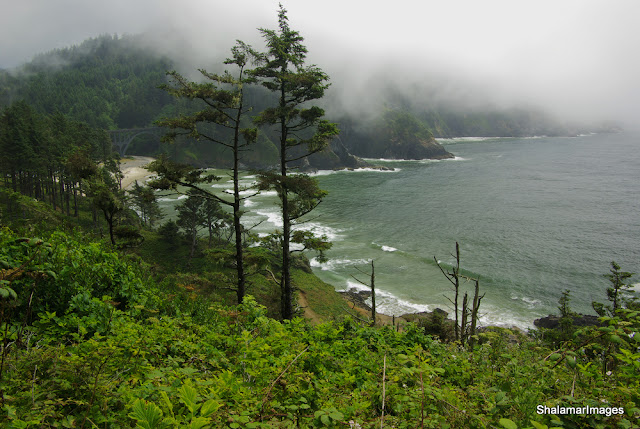
Cape Perpetua Scenic Area. Along with “ Cooks Chasm “ and “ Spouting Horn “ the park offers so much photographically in terms of big waves and lava formations. It should be on the short list of every landscape photographer.

Heceta Coastline with Cape Creek Bridge

Happy shooting. Shawn….

Tuesday, July 21, 2009

Lewis River Falls Hike


Lower Lewis River falls
The Northwest landscape never ceases to amaze me, as each subsequent trip seems to be more picturesque than the next. Laurie and I recently got back from another great photo/hiking excursion. Our original intentions were to access Lava Canyon via rd 83 on the south side of Mt St Helens, which I believe, is now open after some major storm repair. However according to the US Forest Service web site the actual lava canyon trail is now under going several weeks of renovation as of July 2nd. Luckily I usually have an alternate plan and we ended up at Lewis River campground. We arrived at the campgrounds around 9am with perfect light hitting the lower falls that were located only ¼ mile from our car. Had a wonderful time photographing the falls from many different comps and hesitantly agreed we should continue upstream to witness the middle and upper falls. All in all we hike approximately 7 miles through some beautiful riverside terrain. I highly recommend this hike for everyone in the family.

Getting there: From I-5 drive to the town of Woodland Washington and take exit #21. Follow the signs for Mt St Helens and Lava Canyon via State route #503. Drive approximately 46 miles until you reach the small town of Cougar. Continue straight on spur rd #90. Just past the Pine creek information station turn right on what continues to be rd #90. Drive an additional 14 miles until you reach the Lower Lewis river recreation area and campground. Proceed to the day area and park near on of the restrooms Go towards the raging river and follow signs to the lower falls viewing area. The profiled hike will follow the river upstream for 2 ½ miles reaching the upper Lewis River Falls.

Coming from I-84 take the Hood River toll bridge through White Salmon then continue north passing through Husum, BZ Corner and finally Trout Lake where you can tie into forest rd#90. Additionally coming from the West Gorge you can travel through the town of Carson and up the Wind River .


Some additional photos from the trip are found here.

Happy Hiking, Shawn…

Saturday, July 18, 2009

Top Portland Photo Outings


I am profiling great photographic trips based out of the Portland area that have an approximate two hour driving radius. They are in no particular order.


1. Waterfalls of the Columbia River Gorge


On any given day you can bag several waterfalls in any season of the year. Many waterfalls are located within short mileage of the trailheads. I suggest making a detailed itinerary of you’re day and be conservative with you’re expectations. Remember that there is always tomorrow and you may get fatigued much sooner than it may look on paper. I research and then make list complete within good directions before leaving. I then pack the photo bag with only what will be needed for that day. As a resource I use
The Northwest Waterfall Survey


2. Rowena Plateau


If you are going for wild flowers late April to mid May is you’re best bet. The Rowena Plateau is Located at exit #76 off of I-84 the exit sates Rowena/Mosier. There are grand vistas that overlook the Gorge below as well as very unique and photogenic
roads. Other options for this outing include photographing wind surfers out of the Hood River area. You may also cross the Hood River Bridge or the Bridge Of The Gods (toll Bridge) out of Cascade Locks and Visit the Columbia Hills and Then Beacon Rock on the Washington side.


3. Clackamas Whitewater Events


Grab you’re long glass and practice honing various sport photography techniques. Any event on the upper Clackamas or nearby river will do; however the annual
Clackamas Whitewater Festival is the best. For a sample of what you may find click
here. The festivals website.


4. Wild Horses On The Warm Spring Reservation


This should rank as one of the top outings and is really enjoyable. There are many wild horses on the Reservation but you will probably want to find the large herd. It may be difficult to locate the herd at first but if you are lucky they will be located near the north Kah-Nee-Ta entrance. Mt Hood and Mt Jefferson serve as incredible backdrops for horse photography in this location of the reservation. You can go any time of year and in fact snow on the ground really adds a great element. The horses are quite skiddish and I would recommend working with a partner to really get great shots.
Here are a few shots I took from some past trips.


5. Crystal Springs Rhododendron Gardens


Many of you local Oregonians living near Portland may be unaware of the beautiful park that we have right in our midst.
I'm talking about the Crystal Springs Rhododendron Gardens located across from Reed College and adjacent to East Moreland Golf course. For you photographers there are many prospects here. This is a romantic park with many trails and water features. Free admission awaits those that can visit any Tuesday or Wednesday. For more information here is the website.


6. The City of Roses


What a magnificent city we have in terms of photography; from many unique bridges to uncompromising architecture, a mountain backdrop city fountains and of course the Willamette river. Morning is the ideal time from my perspective as the water is often calm and the sun illuminates the city from the east. Once the sweet light has faded you are now ready to get up close and personal with fountains, people, architecture and art.


7. The Annual Tigard Balloon Festival


Launched out of Cook Park In Tigard this annual event draws large crowds. The great thing is that you can get really close to the action, which makes up for the dismal landscape and venue. I suggest a fast 2.8 lens as the first launch takes place in the pre dawn hours. More info can be found here.


8. Covered Bridge Tour Of Cottage Grove


Truth be told I personally wasn’t that inspired the one and only time I took this tour; however I have seen some magnificent photography out of this area and think it deserves a spot on the list. Fall is the ideal time to visit these historic and preserved covered bridges from Oregon’s past. For more info on details about this tour click here.

Sunday, June 28, 2009

Ramona Falls Review And Directions


My youngest son Chase and I just got back from a fantastic hike to
Ramona Falls Ramona Falls is by far the most popular trail on Mt Hood for many reasons. The 7.1 mile round trip is moderate and the scenery is magnificent especially when the Rhododendrons are blooming during late June and early July. This is probably the most moderate and enjoyable 7 miles you will experience on Mt Hood. Be prepared for heavy crowds during the peak months. The Ramona Falls trail is mountain bike and Horse friendly as well, so be prepared to share the trail.

A *note for first timers to the area: Be aware of the river crossing at approximately the one mile mark from the trail head. Look for a white sign on a tree that instructs you to go left to the river. Here's where you will cross the Muddy Fork of the Sandy River. The forest service places a well-constructed portable bridge every spring to aid hikers with the water crossing; usually around the third week in April. They will remove the bridge in the fall to prevent it from receiving storm damage.

After the river crossing you will cross the
Old Maid Flats a huge expanse of boulders and debris initially caused by a massive mudslide that occurred over 250 years ago. This area of Mt Hood is ever changing as the harsh winter storms play havoc on the landscape. A few more tenths of a mile will bring you to a junction where the hikers notification box is placed and also allows you the hiker to make a decision. You see, the Ramona falls hike is not only beautiful but it has the added bonus of offering a loop hike, which is always a plus in my book. Go straight which is the right fork to stay close with the Sandy River and to see more Rhododendrons or go left and take a trail that follows a meandering stream and be witness to grand cliffs and boulder fields. Either option offers great scenery and will take you to that ultimate goal which is the falls of course.

As the falls come into earshot you will have to pass through a horse corral of sorts and blockade that keeps those large equine away from the fragile plant life around the falls. Shrouded by the thick canopy of the forest above, the falls are in complete shade and typically it is considerably cooler in this area The falls themselves are a great spot for a picnic lunch or photography

Other hiking or backpacking options include: linking up with the Timberline trail which is the 42 mile loop that circumnavigates the mountain, or you may head up to Yocum Ridge or nearby Bald Mountain.

Getting there is quite simple really. From the town of Zig Zag Highway 26 Mt Hood turn on to East Lolo Pass Rd and drive exactly 4.2 miles turning right onto forest rd 1825 where you will cross the sandy river on a steel bridge. Go an additional 1.8 miles as you pass McNeil Campgrounds and the Riley Horse Camp signs respectively. As the road narrows to one lane keep to the left which is Forest road 100. Go an additional ½ mile to the huge gravel parking area for Ramona Falls. Recently the forest service has placed two nice clean portable toilets for you’re convenience. An additional note for travelers to this trail head is that a forest service permit or pass is required for parking. Get your daily $5.00 pass or a yearly one at any local forest service office; Fred Meyer has them as well. The parking area will not have a self-pay area that many of you may be used to.

Happy Hiking, Shawn..

Thursday, June 25, 2009

Mt Rainier Waterfall Photography


Snoquera Falls
Day two of our mini vacation was packed with hiking and driving. We left our hotel in Sumner Washington and proceeded east on the 410 through Enumclaw on the heading for Mt Rainier and beyond. The goal for me was to bag a couple of waterfalls that I had recently found out about and then post on the website. I told Laurie that there would be no hiking and that both falls have roadside viewpoints.The 410 becomes "Mather Memorial Highway" and we eventually came to the Skookum falls turnout. All I had was 200mm focal length I could have used 300 more effectively but I went to work setting up a shot and trying to find a worthwhile composition. As you can tell by the lack of a posted image of Skookum falls I wasn’t altogether happy with my results.

Only ½ mile past Skookum was the trailhead for the much anticipated
Snoquera Falls. After some additional reading of my notes on the falls I realized there would be a short hike involved including elevation gain. Laurie as is almost always the case agreed to make the hike with me even though she was feeling ill with a chest cold. The greatest wife a man could ask for is one that wants to see her husband’s happiness and is willing to sometimes forgo here own misgivings so that we can pursue an interest that we may be so passionate about.

The trail up to the falls can be misleading at first because of two sections that have multiple forks that are unmarked. Fortunately I had great notes. A few switchbacks later we rounded the corner to see the magnificent site that is Snoquera Falls. My favorite shot was taken right from the trail and is literally the first glimpse a hiker will see of the falls. I proceeded to get closer to the falls and ascended the terraced rocks below the falls in order to get up close and personal for my second series of images.

The rest of the day consisted of driving up and over Chinook Pass with grand views of Rainier and beyond. Coming off the mountain we headed east and were flanked on our right side by the picturesque Naches River. We drove into Yakima and finally stopped in for dinner at Miner Famous Burgers Nothing special and darned expensive, $ 27.50 for two burger baskets with shakes, WOW!!
Wind Turbines

On the road again we linked up with hwy 97 south and proceeded to Goldendale Washington. The Wind turbines caught our eye so out came the camera for a couple of photos.

Finally we reached Oregon and I-84. We filled up in Hood River then continued south up Hwy 35 towards Govt. Camp and beyond. The sun was fading fast at this point and the sky looked angry. I was hoping to get a dramatic sunset shot from the Trillium lake vantage point. The clouds never did cooperate and the photo gods didn’t smile on us so we headed for home, reaching Clackamas approximately 11:00 pm.


I would say we had a full day and a nice mini vacation together.

Point Defiance And NW Trek Reviews


Coyote Standoff
Laurie and I just got back from a mini vacation up to the Seattle area where we had a light itinerary planned. On our first full day we took a short drive over to Tacoma to visit the somewhat acclaimed Point Defiance Zoo And Aquarium

I feel like going on a rant at this point but will keep this review tempered and concise. First off let me say that Point Defiance Park is quite picturesque and well kept giving us hope for a fantastic zoo visit. Weather was not an issue it was a perfect day for being outside and especially for photography, which is always my interest. Entrance fees to the park are in line with what you would expect to pay $13.00/adult.

The one thing that struck me from the moment I entered the park was that young children seemed to abound in every direction. Strollers were ever present and there wasn’t any sight of animals. We made our way down the paved paths that our map told us to follow until we came to different areas that supposedly housed animals, but they were few and far between. Every animal we did see was caged in what looked like an animal prison. There was glass or bars in front and a net covering almost every habitat.Photography was out of the question; I did not take more than a handful of photos throughout the entire park. We came away pretty disappointed and felt as though the park planners could have done a better job of give the public a better Zoo experience.

There is a very nice caveat to be told however and now here is the rest of the story. On the back of the zoo entrance ticket there is print that reads 2 for 1 entrance to the Northwest Trek Wildlife Park.
The park is in Eatonville approximately 30 min drive southeast from our location.
Bison

We made the drive and arrived at 2:00 pm. The park closes at 5:00 pm. We were pleasantly surprised at the vastness of the park as well as the well-kept forested grounds. This park is unlike the Wildlife Safari In Winston in that you park you’re car and walk the grounds visiting the animals in natural habitats. Photography is fantastic in this park as the animal areas are unencumbered with fencing netting or wire, provided you are standing in the viewing area. Needless to say I was able to start ripping that shutter and came away with some nice photos.

The second ½ of this park is equally as nice as patrons are given colored tokens when they arrive so they may enter the wildlife tram at a prescribed time. The tram has three open-air cars that resemble ones you might ride on the back lot of Universal studios. The tour lasted nearly one hour and is quite relaxing except for the constant narration of the driver. Many photo ops here as well.

The second day of our mini Vacation will be divulged in the next Blog entry.

Wednesday, June 17, 2009

Gorge Hikers Beware !!

 
Just got back from another Waterfall Photography trip with with two of my sons today.The goal was not overly ambitious as seems not to be the norm whenever I go out. We hiked up to Ponytail falls from the Horsetail Falls trail head. I spent 20 min or so photographing and then we proceeded another 1.3 miles to photograph Triple Falls. For those of you planning a trip in the are be forewarned that the bridge just beyond Triple Falls on trail #424 that crosses Oneonta Gorge was damaged and has been removed. The Oneonta Gorge is impassable at this time. This makes a loop trip impossible. As a matter of fact you cannot access Triple falls or beyond to Larch mountain from The Oneonta Gorge Trail #424 at this time. The bridge is budgeted and slated to be replaced this year 2009. Another note able about the area is the fact that there is a sizeable log jam at the entrance to Oneonta Gorge. For those of you including myself this only means that there will be a Little more adventure involved when we decide to don our Tevas and wade up the slot canyon and through the water. for any reason including magnificent photo ops. I hope this helps.. Happy Hiking, Shawn.
Posted by Picasa

Saturday, June 6, 2009

Waterfall Photography Tips


Waterfall photography is both rewarding and challenging. If you’re’ anything like me and enjoy getting outdoors to hike and explore having a goal or a destination like a lake, waterfall or mountaintop to photograph is a must.

Waterfall photography especially has technical obstacles that always present themselves. In direct contradiction to other landscape photography you may often welcome the harsh midday sun that may filter it’s way down through the tree canopy and illuminate the falls. Access to the down stream section of a particular falls may be quite hazardous as the steep canyon walls may prevent the ideal vantage point. Particularly high falls often prevent photographing their full length even with the widest of lenses.

It may be possible to explore the technique of a vertical panarama. Exposure problems are another issue as you may be dealing with many stops of light that the camera cannot deal with. I often revert to HDR to deal with this issue.


Admittedly not all the waterfalls you see here are worthy of a frame and I will admit that looking at endless shots of waterfalls can be quite uninspiring; however I hope you will judge each photograph as a separate canvas and realize that I have photographed many falls for documentary reasons.

More waterfalls can be seen here
You may be wondering how to find obscure waterfalls and maybe wish to find a comprehensive list of Northwest Waterfalls. Well I have to give credit to Bryan Swan who authored the Northwest Waterfall Survey.

Sunday, May 24, 2009

So You Want To Hike Opal Creek Huh !

Posted by Picasa
Opal Creek located in the Elkhorn Valley recreation area is one of the most beautiful river hikes you will ever experience. Opal creek feeds the Little North Santiam River that is equally clear and pristine however opal creeks color is unmatched and truly lives up to its namesake. I suppose you could use emerald to describe the watercolor as well.


If you want to experience the hike for yourself here is a link for great driving directions. I guess the only downside of this hike is the 2.2-mile hike down a gravel-logging road to reach the actual trailhead. This hike is suitable for small children and is classified as easy with an elevation gain of only 200 feet. I would caution parents to be very watchful on a couple of bridge crossings and on section of trail where there is no rail to protect from a substantial fall.


The area attracts extreme kayakers as well as backpackers. There are several wonderful campsites along the river although campfires a prohibited. If you have come for merely a day hike you may opt for the 7.5 mile loop that will take you through Merten mill and Jawbone Flats an old gold and iron mill that operated from 1929-1932. This loop will also take you to Opal Pool, another attraction that will take you’re breath away. If your feeling energetic you can continue past Opal Pool another 1.5 miles which will take you past Cedar flats (ancient Red Cedars) and several small water features. Happy Hiking !!

Saturday, May 16, 2009

Clackamas Whitewater Festival


Anyone that had the opportunity to witness first hand the 2009 annual Clackamas Whitewater Festival experienced great weather and some fantastic race events, and of course a few spills. For those of you who missed it I took some photos of the race that you can see here.The annual festival is run strictly by volunteers with the help of a few sponsors. They have a dedicated Website if you wish to learn more or even enter the race next year.

Sunday, May 3, 2009

Crystal Springs Rhododendron Gardens


Many of you local Oregonians living near Portland may be unaware of the beautiful park that we have right in our midst.
I'm talking about the Crystal Springs Rhododendron Gardens located across from Reed College and adjacent to East Moreland Golf course. For you photographers there are many prospects here. This is a romantic park with many trails and water features. Free admission awaits those that can visit any Tuesday or Wednesday. For more information here is the
website
Posted by Picasa

Saturday, May 2, 2009

Photographing Zoo Animals


     Going on a photographic safari in Zaire or maybe the Okavango Delta is probably on the short list of many amateur photographers. But lets be real; an extravagant safari across the globe probably won’t happen for most of us. There is something special about photographing animals in their natural environment that words can’t really convey.
    If you’re’ like me and enjoy capturing images of animals regardless of the venue then a local zoo may have to suffice. Zoo photography can really be quite rewarding in that you never really know what you will bring home on that media card, as every outing will undoubtedly find animals in different states of lethargy or lack thereof.
    First and foremost I would suggest several visits a year to you’re local zoo as the experience and results will be different every time, also it’s a great way to support the animals. Try to visit on weekdays to avoid crowds. I generally just use one lens and bring a backup. The lens of choice for me is the Sigma 70-200mm f/2.8 DG HSM II Macro Zoom Lens for Canon Digital SLR Cameras
There are times that more focal length would be helpful but more importantly the F2.8 speed is a huge asset in the very dimly lit exhibits and give a very shallow depth of field for blurring out obvious zoo backgrounds.
    To make you’re photographs stand out from the rest it is important to isolate an animal and not try to encompass an entire scene. By doing this you can come up with very unique perspectives of animals not usually seen. If possible take an unconventional route through the zoo based solely on the suns trajectory. By doing this you can use the natural spotlight effect the sun provides in able to highlight an animal’s face.

    In regards to indoor exhibits and dealing with glass enclosures this creates another set of obstacles. Depending on your particular camera and it’s ability to control noise will determine a ISO setting that will suite the noise threshold that you can personally accept in you’re photography. Photography of reptiles and the like will require shooting through thick glass. I look for the cleanest spot and then remove my lens hood; this enables me to virtually press the lens against the glass and avoid angle glare. Here is an example
of a gator I shot through thick glass and I found it looks as though I had an unobstructed view.
    Have fun exploring you’re local zoo and best of luck capturing unique images of the animals. To see a few more of the animals in the Oregon Zoo, go here.

Sunday, March 29, 2009

Backlink Builder

Quality Backlinks are extremely important in improving your search ranking and placement within Google and other search engines. Here is a great tool that You can place on a web page or blog that will allow you're visitors or you to create great back links that are keyword generated and are within the same genre of you're website. Here it is:


Backlink Builder


Enter Keyword (Theme)


Heres what it looks like on my website. If you would like the snippet of code for your'e own site here is the
link

Sunday, March 15, 2009

Picasa Features


Being an amateur photographer I definitely have a need for a good photo management program to sort through all my images. I chose the totally free program called
Picasa from a little company called Google. I have tried several programs including the adobe products but just seem to love how Picasa will search you're hard drives for every image and catalog them. Later you have a chance to input keywords so that you may find photos using Googles powerful search technology.


Picasa also has some other cool features like image adjustments, red eye removal, B&W conversions and filter effects. Lastly I like the ability to make a contact sheet or collage as you can see in this example I used in my other Website Nwlandscapes.com. Give it a try you have nothing to lose.

Posted by Picasa

Free Website


Want to Build a free website ?

For those of you who do not have a web presence whether you have a product to sell or just want to share thought images and ideas. I recently stumbled upon a great site called Yola formerly Synthasite.

There is no catch with this site absolutely zero hidden fees. However they will put a small ad at the footer of you're index page. This Is what I put together in just a few hours. What I like about it is the fact that you can use your Google Ads here to generate income without a web hosting expenditure. You can also sell products here using Paypal

Sure there are drawbacks like a slow server lack of scripting choices and the use of widgets gives the sites a somewhat unprofessional appearance.

I recommend this site if you truly want to build a free Website for yourself or small business.

Sunday, February 22, 2009

Oregon Photo Ops


I have found another opportunity for Photo Ops on the Upper Clackamas River photographing the onslaught of rafters and whitewater kayakers that come down. This is a great opportunity to get great action shots from the bank and to practice and hone you’re skills for action sports. If you check various sites like the Upper Clackamas Whitewater Festival They have an annual whitewater event that brings many photographers out.

Widgets


I stumbled upon this pretty cool site that allows the user to choose from several different widgets ( a portable chunk of code) to display photographs in a fun clean artful way. All widgets are free but allow only limited photos. You may purchase the Widget for a nominal fee in order to display many more images. The site is called goodwidgets.com and you can also customize size, duration, and accent or background colors to blend with and post to your website or blog. Give it a try it's pretty fun.

Tuesday, January 6, 2009

Creative Photography Lighting


As the rain and winds of late have kept me homebound and unable to seek out natural landscapes of Oregon I find myself experimenting and looking for different ways to communicate something photographic. The photo you see here of the chess set was a culmination of creating an improvised setup then finishing the image in Photoshop.
For the setup I simply balanced my glass chess set between two speaker stands and the provided a black foam board as a backdrop. Next I used a lamp without the shade to place directly underneath the table with a 100-watt bulb. Finally I look for color by finding a glass vase that fit over the bare light bulb to diffuse and disperse light upward. Placing My Pentax K10d on a tripod fitted with a 16-45mm f4 lens I was able to take several second exposures allowing the sensor to pick up all that color. I worked the levels and saturation in PS Elements. I only wish I would have photographed the setup for demonstration purposes. I like the results, as the set almost looks cartoonish. Other perspectives of the board including a monochrome version can be found at ShalamarImages.com. This is proof positive that you don’t always need a flash unit or a strobe to take interesting indoor images.
All Content © ShalamarImages.com
and Shawn Martin
Copyrights vigorously enforced